A friend of mine pinned a boatload of links to these one day and I was completely intriqued. How on earth did they make something so beautiful without destroying the petals? I explored the web (at this point I wanted to make one because I love a challenge and pretty things) but after searching I realized no, using real flowers is just beyond my skill set at this point. I had many reasons:
- I do not have much patience
- I do not have the gentle touch of an experienced florist (or a freelance or amateur or a floral hobbyist
- I do not have enough money to rip apart piles of flowers in the name of a "test project"
- Make the Center Rose: Since I don't want to make two tutorials in one, I'm going to redirect you to good ol' Martha Stewart because her web page has a wonderful, easy to follow rose tutorial. This is where I originally learned to make a paper rose, but I didn't follow it exactly this time around: I only had the "wiggly" coffee filters, which are flimsier but I used them anyway because this was an experiment. I took my filters and flattened them out, and they laid pretty nicely. Also, I did not measure my petals I just sort of "winged it" because I have made coffee filter roses previously and have a pretty good idea of what I should make. Lay this aside and grab a piece of wire.
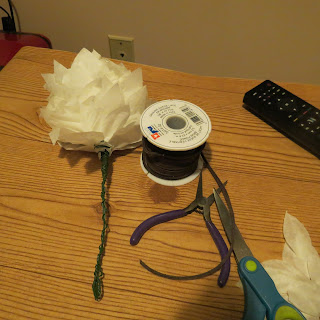
- Weave petals onto second wire. I put 6 petals on each piece of wire initially. I folded the end 1/4 inch to avoid losing my petals off the other side (*I changed this as I went. I decided to tightly wrap the second wire around the center for more stability*).
- Securely attach the second wire to the center rose wire. Twist up a few times, then begin placing the second wire petals against the center rose. When all petals are placed, twist the remaining second wire down the center rose wire, and then secure it with floral tape.
- Layer, layer, layer. I initially started out adding 6 petals then wrapping the remaining wire around the "center rose" wire...grabbing another one and starting again. As the hours past (yes, hours, not agonizing hours I was just doing other things and kept layering and layering...) I would add 6, wrap the wire around the center once, add 4-6 more to the same wire, THEN wrap that one. **I probably would have been more affective making it "wider" by attaching the wires in a big circle with the petals THEN wrapping it around the center wire. Mine ended up being very...tall...because I had to keep wrapping farther down the center wire (you know, because the middle was getting so big) so next time I'll just make the wires get bigger with it!
 |
| Glamelia progress shots |
 |
| Wire ends secured, wrap the stem with floral tape then add decor of choice |
I didn't keep track of how many petals I made, filters I used, and all that jazz, but I would say there were at least 80 added on top of the center rose, probably more.
To take away from the starch white-ness of my cheap coffee filters, I watered down some pink and white craft paint together and doused the petals with it, then added some more pink coloring to the edges of the petals. Mine looked cheesy because I wasn't being careful, but you can add some serious color to coffee filter roses that way.
I hope to make a bigger, more spectacular one next time, but practice makes perfect! That's why I shared this tutorial, so you can ALL practice and we can all get better...together! If you have any questions, comments, or you make one of these yourself, I'd love to know. Just drop me a comment! Thank you so much for stopping by. =)
I hope to make a bigger, more spectacular one next time, but practice makes perfect! That's why I shared this tutorial, so you can ALL practice and we can all get better...together! If you have any questions, comments, or you make one of these yourself, I'd love to know. Just drop me a comment! Thank you so much for stopping by. =)


No comments:
Post a Comment