Showing posts with label cake. Show all posts

Tuesday, January 27, 2015

Elsa Cake

I know many of you out there have a frozen birthday to plan, so I hope this post is useful! 

This Elsa cake was made for my LOVELY niece's birthday using the Wilton Barbie dress cake pan. The cake pan is huge, it took almost two cake mixes to fill it. I put the left over batter into a six inch cake pan and baked it for a side project. After I baked the cake, I gave Elsa a makeshift slip by cutting a piece of blue paper to the size of a mini dress for her, then wrapping the paper onto her with Saran Wrap so she wouldn't get covered in icing!  

Because the doll we had was significantly taller then the cake pan, I put a very thick piece of light blue fondant like a tire around her upper thighs, from the top of the cake to her waist, so it looks like the top of her skirt. That whole section on the top of the skirt, from the blue piping icicles to the triangle "belt" is all fondant where her legs would have been naked. 

The top is a thinner layer of the same fondant, just make a rectangle, press it to her body, then use your fingertip to make a dip between her tata's for a sweetheart neckline.

The skirt was super simple! I iced it blue, then covered it with a thin layer of fondant. The fondant roll out was too big for the skirt, so I used a butter knife and cut the front to be even, but I left the length in the back for a train. The fondant was a little moist so I covered it with sprinkles to make it look glittery. 


Tired of fondant? Want an easier skirt that doesn't taste like a marshmallow? Just ice the whole thing blue and cover it with white and blue sprinkles. Ain't no one here to judge, you know what I'm sayin? Thought that counts, people!

To step my game up a notch, I took that leftover cake (in the small pan), mixed it with icing like a cake ball mix, then I put it on a small plate and covered it in blue icing. I made a sheet of blue rock candy then broke it into jagged sections, which I stood up in the cake ball mix and made a very cool little ice palace to put the candles in (so Elsa's butt wasn't on fire). To finish her off, she got a leftover piece of tulle from my stash as a nice little train shawl. Elsa and the ice palace (with fancy princess candles) are shown below: 


The reaction of the birthday girl, her little sister, and their cousin was beyond priceless. Definitely worth the time! 

I hope if you have any hang ups about making a frozen cake you can ***LET IT GO, LET IT GOOOO*** haha ;) 

Check out my previous posts for other cakes that call out to the kids (and kids at heart) in your life! 


Combining cakes

Mmmmmm, cake. I post an awful lot of cake tutorials, even though I make many other crafts throughout the year. I guess cakes are the easiest to explain for me! 

 I don't usually go looking for cakes to make, they just sort of find me. Word of mouth, someone remembering a cake they saw me make on facebook, things like that. This cake was no different! I didn't have a pan big enough, so I'm going to show some behind the scenes of putting together multiple cakes to make it look like one big ol' sheet. 

When an old friend from high school (excuse me? What do you mean next year is our 10 year reunion? That is so wrong) asked me to make a cake for another friend's bridal shower, I couldn't resist! She sent an inspiration cake, but I cannot find it through Google for the life of me. If I find it I will update this to include the link. Regardless, it was a square cake that was in the similar color and pattern as the one shown above. The issue was we needed a MUCH bigger cake, to feed 40-50 people. I only have an average sized rectangle cake pan and instead of buying a bigger one, I just attached together four separate sheet cakes to end up with one big two layer cake. 


First, bake all your layers (since I had one pan, I would cook one, take it out,fill the pan back up and while that cooked I would trim the other cakes). If my cake looks funny, it's probably because it's a marble cake lol. Anyway,I'm not fanatical about getting my cake layers completely even, but I try to trim the middle with a large bread knife to get it as close to even as possible. 
 

After the four layers had cooked, I decided to "crumb coat" (apply a thin layer of icing and letting it cool for a few hours to smooth it all out) the cakes into two cakes. So, each cake is actually TWO sheet cakes stuck together side by side with icing. Get it? I've got a picture below 

After I let the cakes soak the crumb coat for a few hours, I removed them from the fridge, dumped a tub of icing on top of the bottom layer, then placed the top layer on. I ended up cutting off most of my crumb coat, because I cut the sides and top to give a more rectangular "gift box" appearance. After all my cuts were made (look how many crumbs are in the picture below!! Wipe those away with a clean paper towel before icing!)I added another crumb coat (super thin layer of icing) then put the rest of my white icing on. To avoid having a noticeable dip between the cake layers, fill the middle with icing until it evens the two layers, then proceed to ice the whole cake. To make the icing more white and less cream colored, I added white food coloring (found in Michael's  cake department).
The black icing was in a prepacked tube from Michael's, because I don't love to make black icing :) it was a perfect size also. It did not spread as well as I had hoped, but I have not practiced fine scrollwork much so I can't be too upset at the outcome! You can find scroll work patterns to follow online, but I just decided on a pattern and committed to it. 
Finally, I made some pink fondant and sized it to take up the majority of the cake. See that pink icing tube in the bottom of the photo below? That's the same brand and size as the black, but I bought the pink to make the border around the edge to clean up the cake's edge. 

Remember, just because you don't have a large cake pan it does NOT mean you 
can't make a large cake! If all else fails, keep throwing icing on that bad boy until it looks tasty ;) 

If you have any questions, don't hesitate to ask. Thanks for stopping by! 


Wednesday, July 18, 2012

Ninja Turtle Lego Batman Cake


        My friend Kaylin contacted me about 2 1/2 weeks before her boyfriend Dan's 30th birthday party, saying she REALLY wanted to surprise him and make him a fantastic cake full of his favorite things. Naturally, I was all gung-ho about making what she described as a "Lego, batman, and maybe Ninja Turtle" 30th birthday cake, but I was also a bit skeptical because...well, because Kaylin and I have known each other a LONG time and working on a cake together seemed awfully dangerous  because we really know how to push each other's buttons. Kaylin claims I have a super short temper (yes, pretty guilty) but ask anyone that knows HER and they will tell you that yes, she can really push some buttons. So, you know, there was that. Regardless, we were still both sucking it up and ready to make this surprise birthday cake!
      I baked the cakes, gave them a crumb layer, and had them waiting for decorating which was going to take place on Monday afternoon (which gave us about 6 days at that point). Monday morning, however, I woke up to a devastating message in my facebook inbox that said she would not be available to make this cake because Dan's dad had passed away. This was also the day before Dan's actual birthday. I didn't know the man, but I can assure you I was totally crushed, for both of them. Kaylin and I have both lost dear, loved members of our lives in the last few months and...quite frankly, neither of us have really gotten over it. My dad lost his best friend (which hurt me WAY more then I could have ever expected, it hurts so much to see really...ALIVE people pass on, you know?) and Kaylin's former stepfather and good friend passed away within days of my loss. I loved and cared for them both, they were both too young to go, and even though I functioned and went on about my business those losses have set so heavy on my heart since May.
        I read a book last week that said something I truly believe: "Death doesn't add to death, death multiplies" (Absolutely True Story of a Part-Time Indian). Basically, every loss seems to come flooding back to you at every funeral, so it's like you're going to every funeral at once. The thing is, though, I can't imagine how Dan felt. I cannot imagine the pain of losing my father, I cannot imagine the weight of having it so close to my birthday, and I cannot imagine handling it as well as he has.
      Kaylin was going to cancel the cake because he needed her, and there was no time for us to meet up. They decided, however, to still have the birthday party because there was no point sitting and wallowing at home, you know? That's why, on Wednesday, I began planning the cake again and I didn't get that puppy done until 2 p.m. on Saturday when I had to leave for work. All prep work got done on Friday, and I put it all together on Saturday. Miracle work! I ran out of room on the front so I put the batman logo on the back with a "gotham city" cut out skyline (to cover some ugly fondant work).

Alot of talk, so here are some pictures:
Back of the Cake, seen above
Sewer Lid: Printout of Sewer glue to Poster Board


The Ninja turtles were made of marshmallow fondant and their pupils were wilton's edible marker.
The legos were also mm fondant; I mixed the colors, rolled them out in sheets, then cut them into semi-even lines. I cut my first "lego" and used that as a template for the size of the rest. 

TO make the LEGO wall: I rolled out a white piece of fondant as the base, and used egg whites as an adhesive. Lay the legos in a color pattern, egg white-ing them to the white base. When complete, wiggle into place on the cake (I had chocolate frosting on the cake already and it attached to this. I made a smaller one on the base of the cake, adding circles of fondant to look like the tops of the legos and attached that as well. I then rolled out and placed on one big piece of (very lumpy, whoops!! Ran out of time to fix that) fondant and then took a kitchen knife, feeling the legos underneath, and "peeled back" the outer layer. Careful not to peel too far and show the cake. 

I hope this inspire you to mix and match your own favorite characters. If you like it, it should all be on one cake, dangit.

Monday, June 25, 2012

""Nightmare Before Christmas" Wedding Cake

Today I'd like to share a "Nightmare Before Christmas" wedding cake a friend of mine asked me to make for her...for her Father's Day wedding. Originally, the wedding had been planned for October so she had dreamed of having a Jack and Sally cake topper. When they decided to bump it up to June (she won a free trip to Florida! They decided to use that opportunity to make it their honeymoon and decided to give everyone a week's notice that they were doing a small, casual wedding instead of the larger one they had been considering) I was given one week to whip them up a cake. I think I did pretty well, time alotted!


Secure tape down before wrapping

Foam Packaging cake stand, shown here with un-iced cake

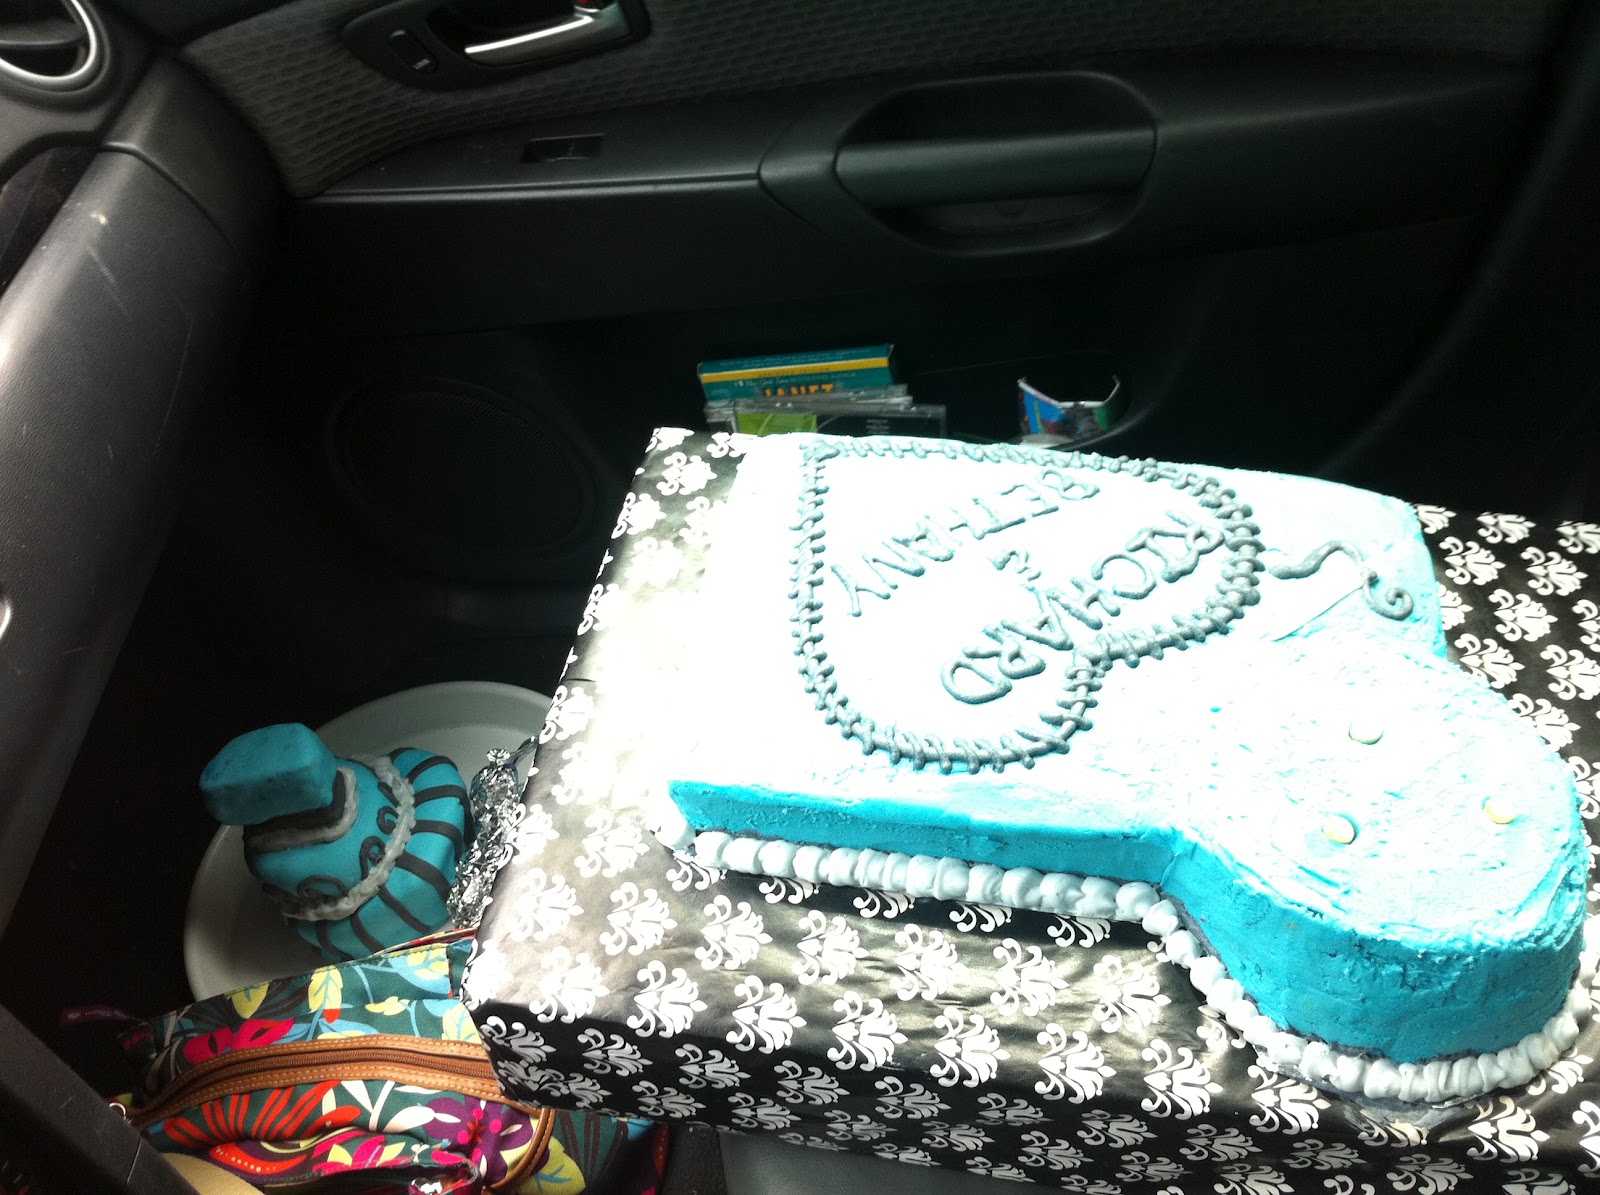
 The bottom was a basic sheet cake with butter cream frosting (a 13x9 pan) using this delicious and very dense (which is GOOD for these stacking cakes!) Dense White Wedding Cake Recipe . The only change I made (as suggested by user submissions) was adding some almond flavor on top of the vanilla, which gave it that good ol' "wedding cake" taste. Mmm.  I was out of parchment so I sprayed the pan with an ample amount of food release and powdered thoroughly with flour (which is why the cake appears discolored without the icing, above). When the cake cooled, I gave it a good "hand brushing" and removed most of the heavy flour-ing (not like you can tell with icing on it! I just wanted a good taste all around haha). That beautiful "present" being used as a cake stand is actually a foam packaging unit that came with my computer. Pretty wrapping paper ($1 at Target) and some **Shelf Liner** which is infinitely useful in keeping big pretty cakes in place made this foam packaging a wonderful, lightweight, and sturdy cake stand...best of all it was free! Waste not, want not =)

 Because I was not sure when I began baking just HOW I planned on making this topsy turvy tower, I baked two 6 inch round cakes and another, thinner 13x9 rectangle cake. I finally found a wonderful tutorial for making those neat topsy turvy (aka "Mad Hatter") cakes at My Sweet and Saucy . I particularly liked this one because I prefer a photo and text tut over a video when the subject is something I do not need to see happening (like when I learned to smooth fondant, THAT was a video day!). She also has a beautiful website and her tutorial is very well written! I realized I should have made more round cakes, but I was out of eggs and time. Instead, I hacked the second rectangle cake into circles and arches using the 6 inch pan as a guide.
Use "tower" pan, cut out corner
The "Final" bottom product
"Dry Stacking" (Not Technical term)
I cut out one corner (again, using the 6 inch pan as a guide) because I wanted the "tower" to appear as part of the cake without taking up much surface space .I think we can all imagine it's easier to serve a sheet cake then it is to serve a tower! =) . I cut circles and arches from the "extra" sheet cake, then stacked them all different ways to see how they would sit best. I ended up icing the bottom two together, then icing THAT thoroughly with the blue until it appeared it was part of the cake. I then cut and put in a handful of wooden dowels to support the weight of the tower. I wrote their names with butter cream (a bit runnier then usual for easy writing) in a free hand heart made to look "stitched". I have no idea how I made this all so straight, pure luck I promise. I made the needle out of marshmallow fondant (Have you tried making Marshmallow Fondant ? Here is a very insightful tutorial with all sorts of tips! I don't use flavor, usually I just pop the ol' marshmallows, fondant, and crisco for greasing into a pile, but I imagine you'd have much greater results the recipe's way!).

A Breakdown of The Final Tower
I cut a cardboard circle just a little smaller then the 6 inch cake pan (this pan was a life saver! How many times did I measure with this thing?), placed that on a lazy Susan on another piece of shelf liner, covered the cardboard in aluminum for good measure, then placed one 6 inch cake on that. I cut the second 6 inch cake on an angle as the tutorial instructed, iced part of it on the bottom layer, and then iced the whole thing lightly (I don't remember where I learned this, but icing a cake with a thin layer and letting it cool or set overnight will greatly reduce the cake crumbs on your finished icing layer, I use the same method before I'm putting on fondant). At this point, I didn't HAVE another cake for the second layer of the tower! Instead of freaking out, I simply took the triangle I cut from the bottom layer and took a few other solid pieces together and iced them to form a smaller, not as curvy layer (this is why my swirly layer appears "smushed"). She just wanted the bottom to be tasty and the top to be pretty =) but it turned out tasty too I promise, it just didn't make such a pretty cut! It was terribly late and I was very tired, so I unfortunately did not take pictures during this smooshing process. I tinted my marshmallow fondant to almost match the cake (with some set aside for grey and some leftover still white), rolled it out, and covered the bottom layer (the second layer was off to the side at this point). When the fondant was as smooth as I could get it, I cut it, then put three wooden dowels in that stuck out about 4 inches above the top of the bottom layer. I cut the stripes from rolled grey fondant with a kitchen knife (no, they weren't perfect, it's part of the charm!) and GENTLY wet them before attaching them to the cake.I stretched them long enough so all of the ends would be hidden by the second layer of cake and the bottom piping frosting.  I put fondant on the second level and set that straight on the wooden dowels. About 2 inches of wooden dowel were still sticking out, and instead of ripping them out of the cake to cut them, I used clean foam (attached with icing, covered with fondant for appearance and to keep chemicals off the cake) and made a stand for the topper because it was heavy and I felt uncomfortable setting it directly on the cake (Did I mention it was like 90 degrees at this outdoor wedding? I was NOT watching my polymer clay Jack and Sally fall off a melted cake). I used a large, round wilton tip and piped out a loose edge around the cake (I wanted it to have an ample amount of icing but I did not want to put in great detail since I knew this would melt a bit at the ceremony, and I was right about that!). I added the curly cues with the writing icing from the bottom layer, and I piped the light grey icing around each "layer" of the tower for a cleaner look.

Transporting the cake 40 minI cut the stripes from rolled grey fondant with a kitchen knife (no, they weren't perfect, it's part of the charm!) and GENTLY wet them before attaching them to the cake.utes away on winding roads was TERRIFYING. I kept the large cake on my front seat and, because I couldn't bare the thought of not being able to see all of it, I set the tower on the lazy Susan in the floorboard on a towel. Jack and Sally traveled, wrapped in foil loosely, on the SIDE of the lazy Susan (not on the cake). I attached a picture of the set up. Everything arrived smoothly (thanks, shelf liner!). When I got there, I placed the tower onto the circular platform on the sheet cake and piped around the bottom edge of the tower (I brought the piping bag of EACH icing in a cake pan, just in case). I put some icing on the top before putting Jack and Sally on the tower, for safety's sake. I also added a "Nightmare Before Christmas" quote on the *cough cough* cake stand to tie them together and add a little more whimsy to the cake.

If you have any questions or comments, please let me know! I hope this helps you make your own semi-fancy cake at home. 

Monday, April 16, 2012

Angry Birds in Space Cake Tutorial

     My younger half brother (MUCH younger, in fact, my favorite surprise that there ever was in the whole wide world) turned the big "8" this year. After being disturbed by how quickly time has been flying by (Are you sure he isn't turning 3? 5 MAYBE?) I started asking him the tough questions: what kind of birthday party are we having here? He was torn between "Wipe-out" and "Angry Birds". Once I got the text from my stepmom asking me to make the cake (about time, jeeze) I swayed him into an Angry Birds cake because it would look way cooler and it's spring, too cold for a full on "Wipe Out" party!
     I sweetened the prize by adding on that I would make it an "Angry Birds: SPACE!!!!" cake and he was totally game. The next part of the mission was the obvious: begin scouring Pinterest. There are some seriously amazing Angry Birds cakes out there. Fo' real. My only issue was I really wanted to reflect the Angry Birds in SPACE, with their fancy face masks and capes and what have you. I had some totally awesome results:
.....and some things that went horribly wrong that I will share with the hopes that someone out there can make it TOTALLY RIGHT*
*referring to my "lollipop meltdown", below.
1.) The Characters:
            The night before I started my characters, I made a batch of Marshmallow Fondant (See directions here for Marshmallow Fondant). I divided it into small batches and mixed in colors: yellow, orange, red, purple, lime green. I left the majority white. I used the fondant for noses and eyes.
            For my "Angry Birds in Space" characters, I decided I wanted to make my characters out of cake balls, versus making their bodies out of fondant. Bakerella's website is where I originally learned about the art of making cake balls. Googling "Cake Balls" or "Cake Pops" can yield many helpful tutorials as well. I made my cake balls with lowfat chocolate brownies and fudge icing. After the mixture had cooled, I shaped it into the characters and planets that I wanted:
 In total I had: 4 round green pigs, 3 round red birds in different sizes, 1 large green bird, 1 triangle bird, 1 square bird, 1 long "log" that I poked to look like the three little birds, 2 "planets" (round balls with divots) and 3 rectangles to "protect" the pig.
After these had cooled in the freezer for about 4 hours (I had other stuff to do, they don't need to be in there THAT long...I'm just forgetful) I busted out the white, red, and green candy melts and got my bowls melted/my dip on. For the other colors, I used Wilton food dye in the white melts. I used Wilton's Edible Ink Pens for the eyes and pig nostrils, and at the last minute I made some fondant eggs.

2.) The Lollipop Meltdown:
I had this BRILLIANT idea of making a bright blue lollipop "Orbit" to stick in around the pigs. It's part of the game, the orbit...anyway, it would look TOTALLY awesome but I had never dabbled in candy making (I made caramel for the first time on Easter and this was about a week later...not much time to hone my skills). Instead of adding color AND a flavor (I had no fruit flavors on hand, just vanilla and almond), I added a packet of Kool aid. First Round, I added "Fruit Punch" (I was in a rush! The packet was blue!) and I got red:
 
I added lots of blue food coloring, but it was a lost cause and I think the excessive coloring made it not set well. Besides, I had no mold and I was winging it. There was purple (red +blue=purple!) lollipop crap everywhere! For round two, I got more serious. I made a mold out of aluminum foil (My brilliant boyfriend's idea! Where was he the first time around?) and found the berry blue KoolAid right next to the Fruit Punch.
So, I made it, it cracked when I peeled off the foil, I ran it under SUPER hot water and molded it into shape again but it was never strong enough to stand alone at room temp. I hope someone figures this out, I encourage you to make it!
3.) The Cake:
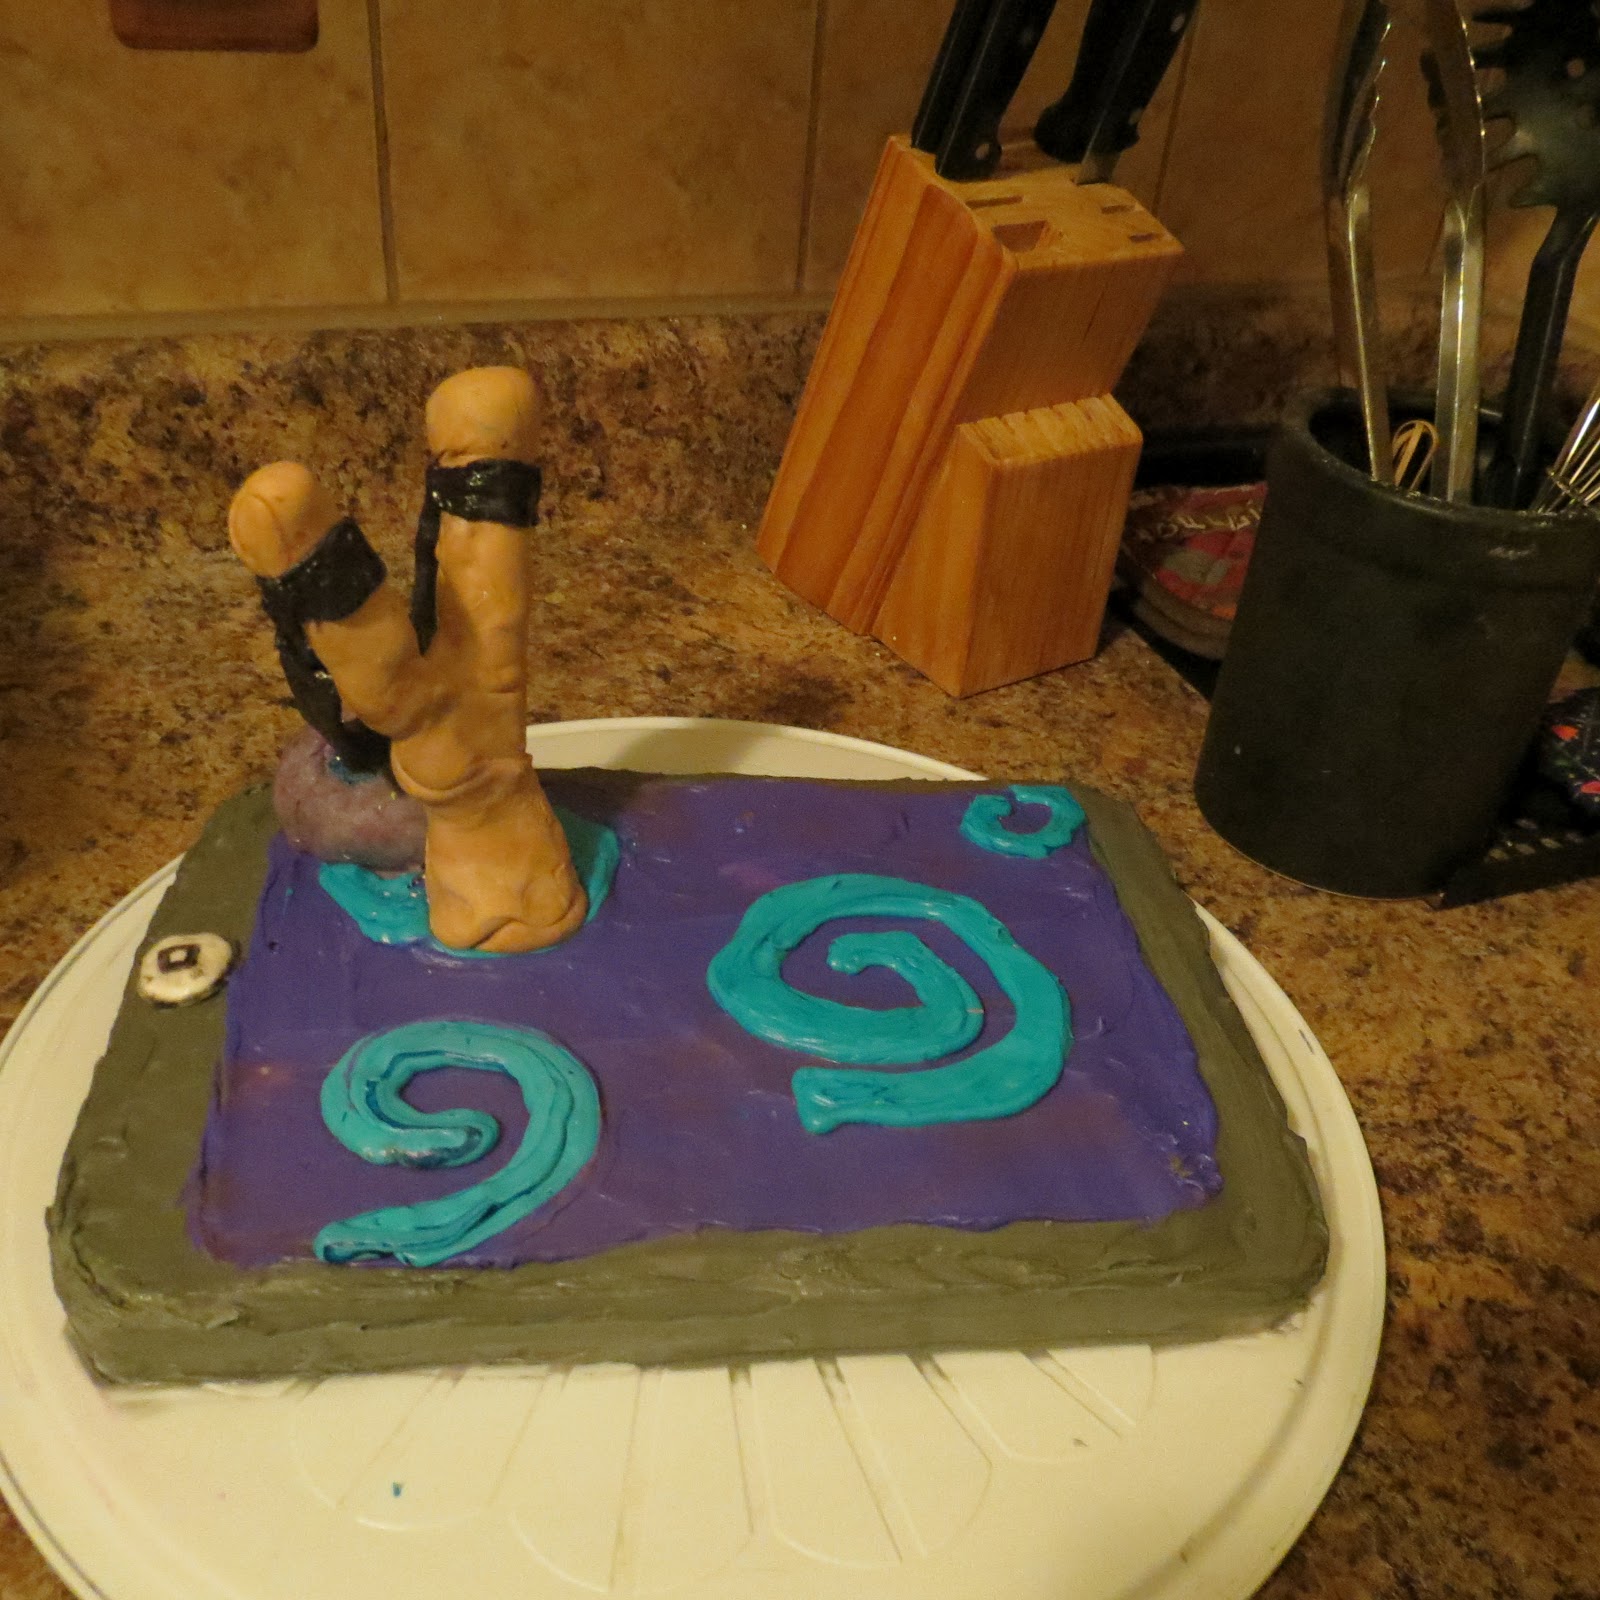
    The cake was a dense white cake recipe called Nany's White Cake. I made it in a rectangular cake pan (I don't know the measurements of the pan, whoops!) shaped like an Iphone. I then iced it to look like an Iphone playing the game (I saw this online somewhere and couldn't find it when re-googling! If you know where it's from, please leave a link, it ruled!).

     The slingshot was made from two long lollipop sticks haphazardly wrapped in majority of my fondant colored brown, and I made a black fondant sling. I didn't realize how HUGE it was until after I made it, and I was too lazy to rip it apart and change it. I just leaned it against the planet and called it "adding character".


4.) All Together now....
After everything was shaped, colored, given a face, and TRANSPORTED to the party (the scariest part), I popped it all together (I kept the characters off, assuming they'd all fall and smear the icing while I drove...like this pile of mini cupcakes I added from the freezer at the last minute to hold a little "Angry Birds in Space" Printout I had cut off their logo picture and taped on to a toothpick (is it copyright infringement if its for personal use and not for profit? I hope not!)
I would like to note that I left off everyone's head tuft of hair, as well as their cute little ears! I have a tendency to get way ahead of myself and tack on too many tasks and I forget the important stuff like ears! I hope you enjoy it anyway, I did and so did my brother! =)

I hope this helps your next Angry Birds bash! I'm going to add a supplementary tutorial on making an Angry Birds Pig Pinata in like 2 hours or less for under $10 (how lazy am I? Awesomely lazy!) Thanks for stopping by!
 
Blogging tips